Showing posts with label before and after. Show all posts

Saturday, August 12, 2017

Fireplace + Shiplap + Rustic Mantel

Hello again!

Anyone else LOVE shiplap? This girl sure does! A few months ago I finally talked Justin into putting (fake) shiplap above our fireplace and building a new mantel!


You may remember that one of our very first projects when we moved into our house was to put (fake) rock up on the fireplace and enclose a built in for a TV. However, it always felt like something was missing. The answer of course, was shiplap! After some research it seemed that people were using all kinds of different materials and widths. We brought in some different sizes of boards and decided that our shiplap would be 6 inches wide and would use one of the cheaper MDF boards. The paint color that was recommended by numerous people was Sherwin Williams Antique White, which was what we also chose. In addition, we used a penny to evenly space the boards apart so that there was a slight separation. One of the things that did seem pretty consistent across the blogs and pictures I looked at was framing out the shiplap along the sides and top.


Next came the new mantel, which was a very similar process as building the floating shelf in our bathroom. Basically, it is just a hollow box that fit over top of the old mantel and was secured. Of course, we used our favorite Dark Walnut stain by Rustoleum. (Here is great tutorial for this project)


 Check out the changes that have been since we moved into this house:


 November 2014


December 2014


January 2016


January 2017


Currently

This space is certainly the focal point of the room and I love the farmhouse feel. I had been looking for a tobacco basket for AGES when I stumbled across this fake one at Kirklands. It was a fraction of the cost of an antique one and readily available! The magnolia wreath, candles, and all of the lanterns are also from Kirklands (notice a theme here??). 

As always, I am leaving you with a little inspiration of other beautiful shiplap fireplaces and living rooms. 

Sources clockwise from the top: (1) (2) (3) (4) (5) (6)

Thanks for stopping by!

Thursday, July 20, 2017

DIY floating shelf

Hello all!

I think, I hope, I am going to jump back on this blogging train! Life is so very full during this season, but I've missed sharing in this space. :)

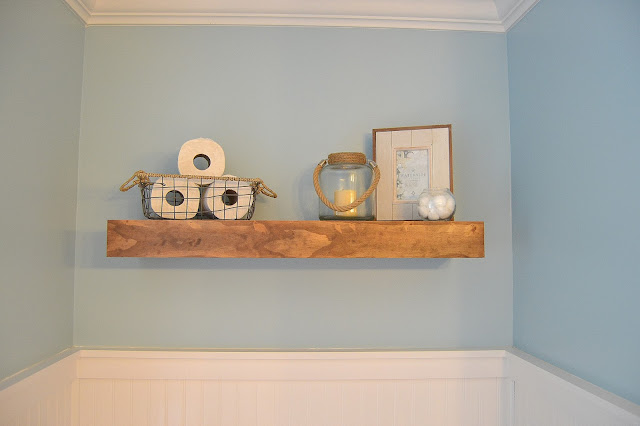
Today I am sharing a quick DIY project that we added to our master bathroom (umm.. a while ago!). I was inspired by the Shanty 2 Chic ladies to have my husband build a floating shelf to go in the space above the toilet. This shelf turned out so cute I found another area in my house that also needed a shelf! (Which I will share another day!)

You can check out the plans from Shanty 2 Chic here!


Here's how the shelf turned out and is currently styled:


If you would like to see the full Masterbath Update click here!

As always, I had lots of inspiration via Pinterest to help me style and decorate! Check out a few of my favorites below.

Sources: (1)(2)(3)(4)

Source List:
Stain color: Rustelueom Dark Walnut
Frame: Homegoods
Basket: At Home
Lantern: Kirklands

Sunday, March 20, 2016

my pretend entry way and DIY shelf

Oh hey friends!

It has been 2 whole months since I have sat down to blog about anything ... I went back to work and the slow pace and uncluttered life with a newborn is a thing of the past. I had thought I would at least post monthly updates, but that hasn't happened either.

The good news is that Spring Break is just around the corner! 

In the midst of all the busyness, the hubby finished up a project in our kitchen and dining room. These rooms are now officially finished .. until I decide to change around some decor! (Check out our Farmhouse Kitchen and Dining updates here!) This house doesn't have a true entryway, so I decided to pretend that an empty space in our kitchen was going to serve as our "entry way." We certainly drop things in this area when we get home, so why not make it pretty and functional.

I was inspired by the girls from Shanty 2 Chic to have Justin build a simple shelf with some hooks to go above a thrifted bench I found at my favorite local consignment store. I would have loved, loved, loved to have planked this wall as well, but the dear husband says planking is much too personal for resale.


(If I had not already found a bench I liked, this bench would have been on the DIY list as well!)

Here's how this space turned out: 


The 2 frames that actually have pictures in them both came from a super clearance sale at Kohls and the other frame and pillow are clearance finds from Kirklands. The letters of our last name were a souvenir from a trip to the market in downtown Charleston on vacation a few years ago.

I have tons and tons of beautiful entryways pinned to inspire me .. here are just a few of my favorites!


Sources clockwise from top: (1) (2) (3) (4)


Happy Palm Sunday friends!

Monday, January 25, 2016

currently: the dining room


Hi friends,

After sharing our updated kitchen last week, I thought maybe a look at our dining room would be appropriate!

 (You can check out our Kitchen updates here!)

Our dining room hasn't undergone any major changes-- really just paint, decorating, and a more updated light fixture. It is actually very similar to the dining room we had in our previous home in terms of how it is decorated. I used most of the same pieces and added in just a few new ones.


Our dining room table is a DIY project by my husband from several years ago. We are thinking that this summer we may be ready for slightly different look as this one never turned out the color we had envisioned. No highchair in this space quite yet, but it is waiting in the attic!

For the longest time our walls were bare because we were waiting until we began our kitchen updates and repainted the space. Adding the curtains and shelves made a huge difference and definitely helped the space seem more homey!


These Ikea shelves were inspired by these photos from Crafty Teacher Lady and Young House Love.


 A closer look at how they are currently styled.


I am loving this little vignette I created from a wooden disc (handmade by my husband for our wedding), an assortment of glass jars, and an Ikea pitcher. Plus, the framed print only cost me a few cents for the cardstock it is printed on!


My current centerpiece is a piece of handmade pottery I brought home from Honduras 2 summers ago!


I was finally able to get my DIY chalkboard menu back up! This was a simple project from a few years ago where I turned a metal platter into the perfect menu.

Here's the details:
Paint Color: Requsite Gray by Sherwin Williams
Bar stools: Kirklands
Chalkboard: World Market
Home Sweet Home Sign: Hobby Lobby
Table Runner: Jane.com
Shelves: Ikea
Items on shelves: Assorted- Ikea, antique stores, Goodwill, At Home, Kohls
Light fixture: Lowes
Curtains: Kohls


Saturday, January 16, 2016

kitchen update reveal!

Oh, hello 2016!

So I have to admit that I have several Holiday/New Year's  posts sitting half finished in my drafts and I am trying to decide if it is too late to share them. I have so many ideas ... but I'm really short on time these days! Some little person seems to take all of it! :)


However, I am finding time to share the long awaited reveal of our kitchen updates! 

I have had visions of a farmhouse kitchen forever and I have pinned and saved inspiration since we moved into this house. It took several months, but the space has finally come together.

This project first began in July when we browsed around some stone yards and finally choose some counter tops. I really had my heart set on Carrera Marble, and surprisingly it was in our budget, but our fabricator talked us out of it. Instead we chose Giallo Ornamental Granite. Apparently, this is a pretty popular stone because I have seen it all over Pinterest! We love the light color and how it integrates grays and browns easily. If you are local, we worked with Carolina Custom Surfaces and we were very pleased! We also ended up choosing a white cast iron sink for the space. I would have loved a true farmhouse sink, but that would have meant altering the cabinets, which wasn't an option.


Our countertops were installed in August and we had decided to extend the width to create a true bar area on our peninsula. We added 7 inches to create a 12 inch overhang, perfect for some barstools. Justin then added beadboard around peninsula and the next step was painting the kitchen and dining room. I struggled to choose a color, so I narrowed it down and bravely told Justin he could have the final decision. I came home from work one Friday to discover he had chosen Requisite Gray by Sherwin Williams.. and I loved it! 

The next task was refinishing the cabinets and changing them from oak to white. Justin used Rusteloum's Cabinet Transformations and like I said during our last kitchen update (read about it here) this is not a quick process, especially when you still have to work! About 3/4 of the way through, we suddenly had a baby! Obviously, our goal of having the kitchen completed by the time Makynli arrived didn't happen.

Things got put on hold for quite a few weeks, but Justin was eventually able to complete the cabinets and change out the pulls. I insisted that I wanted the drawers to have different pulls than the cabinets, which was a little bit more expensive and a little more complicated! (However I discovered that buying pulls in sets from Amazon is way cheaper!) Justin then moved on to the backsplash in December. We chose a simple and clean white subway tile and a light gray grout. My only regret about this project would be the grout--a darker color would have suited the space better. On New Years day Justin finally put the finishing touches on everything! 

It is quite the amazing before and after! I am so pleased with how it turned out. I think it makes the space look brighter and bigger, which is important in a small kitchen. 

Before:


After:


 I have plans for a little coffee station area .. I'm slowly collecting the right pieces!


Source List:
Paint color: Requsite Gray by Sherwin Williams
Counter tops: Giallo Ornamental Granite
Tile: Lowes
Stools: Kirklands
White pitcher and canvas art: TJ Maxx
Cabinet and Drawer Pulls: Amazon
Rustoleum Cabinet Transformation: Home Depot (ours took 2 large kits)
Faucet: Lowes
Sink: Lowes
Mail Holder: Kohls


Sunday, October 11, 2015

Ikea bookshelf + nightstand hack!

Hi friends,

I have more nursery projects to share with you today! Besides hanging some items on the wall, things are finished! (Which is a good thing as my due date is only 4 weeks away!)

Justin took a plain Ikea bookshelf (like the one below) and added a stained wooden top. It was an amazing before and after transformation!


 Once I saw how great the bookshelf turned out, I insisted that the nightstand needed the same wooden top!

Here is the plain white nightstand:


And here is how it turned out as well!


I adore the mix of the wooden tops and white bases. I think it really helps to break up all of the white and give the room a slightly more rustic look so that it isn't overly girly! Plus, Ikea furniture is budget friendly as well!

Sources:
Bookcase: Ikea Kallax series
Nightstand: Ikea Hemnes series
Stain: Rustoleum's Dark Walnut

You can also check out the DIY Blanket Ladder that is pictured here!