Showing posts with label crafts. Show all posts

Wednesday, December 16, 2015

baby keepsake ornaments

Hi friends,

I have found it sort of funny how many people have shared baby ornament projects with me on Facebook! However, no  matter how cute I think they are, I haven't managed to actually complete one of these ornaments .. even though I already have the supplies in my craft materials! Eh, there is 9 days until Christmas right?

If you are looking for an easy gift or a special keepsake for Baby's First Christmas then check out these ideas for inexpensive, handmade ornaments!

1) Hospital Scrapbook Ornament
Materials needed: clear ornament, ribbon, keepsake items from the hospital (ID tags, hat, bracelet, etc.)

This is a creative way to display those precious memories! See these 2 ideas from Thrifty Crafty Girl and Beauty in the Mess.


2) Handprint or Footprint Ornament
Materials needed: Plain round ornament of any color, glitter or paint, pen, ribbon

Trace your little ones foot or hand or just dip it straight into the paint. Add a personalized name and date! I think these are adorable, but fear they might be a Pinterest fail if I tried to make one!


3) Salt Dough Ornament
Materials needed: Salt, flour, water, paint, ribbon.

A tried and true favorite is to make handprints or footprints with salt dough! You could paint them or leave them blank. If you don't want to make the dough yourself, there are many very similar kits at places like Michaels. Click the link below for an easy to follow recipe.


4) "Snow Globe" Picture Ornaments
Materials: Pictures, fake snow, clear ornament, ribbon

How adorable is this ornament featuring baby's ultrasounds? You could easily replace the ultrasounds with a picture instead!


5) Scrabble Ornaments
Materials: scrabble pieces, hotglue gun, ribbon

Basically, you can use scrabble pieces for most anything! Check your local thrift stores for a cheap game that you can turn into DIY projects.


Maybe I will actually get around to making one of these this weekend! Happy crafting! :) 

Sunday, October 4, 2015

songs of solomon pallet art

Hello friends,

This weather ya'll .. there is only so much rain we can all take! But I know we should be grateful we are not experiencing the flooding that some areas are!

On this rainy Sunday afternoon I am writing maternity plans and there is simply not an end in sight .. I've decided to take a break to share a project with you that I actually completed over the summer!

I had shared previously about the pallet art that I had created for our bedroom a few years ago. You can check out the original post here and a more recent post about our master bedroom here as well. One day I simply decided that I wanted to redo the artwork and went to work!

Before:


After- a fresh coat of paint and a change of font style.


These verses are just perfect for a master bedroom and serve as a great reminder.

And as a bonus- the cozy reading nook in the corner finally got a new lamp! And my favorite pillow from Kirklands!


Easy, simple projects are my favorite!


Thursday, August 13, 2015

DIY Bow Holder

Hi friends,

This past weekend we took one last trip this summer to the mountains to celebrate Miss. Makynli with a baby shower! We received the prettiest DIY project from my husband's aunt and cousin that I wanted to share with you!

Justin's aunt created a bow holder and his cousin made several headbands.  I had a similar project on my to do list, but I think this one turned out better than what I might have made myself!


Materials needed: canvas, hooks, pretty fabric, ribbon, and of course bows!


Other ideas for a DIY bow holder involve using a frame, an initial, or even a oatmeal canister!

Sources clock wise from top:
(1)(2)(3)(4)

As for the nursery itself, it is coming together! 12 weeks to make sure everything is ready!

Tuesday, August 5, 2014

DIY pallet artwork

Hello friends!

If you have spent any time on my blog or follow me Pinterest, then you know that I love wooden signs, particularly those made from old pallets! I've made several myself so far, and I am really pleased with how my newest pallet artwork turned out! (I promise I do not display all of these at once! Several of the ones I have made have been seasonal, plus I love to change out what I have up!)


I just love this reminder .. definitely words to live by! Like before,  I simply stained the pallet boards with Rusteleom's Dark Walnut color and then free handed the letters. The letters never turn out 100% perfect with spacing and such, but I suppose it adds character? :)

I've had this project in my mind for quite some time now. I gathered my inspiration from Pinterest of course!

 
Sources: All from Etsy

For more pallet artwork and other DIY projects, be sure to check out my Home Projects page!

I'm linking up today at:

Wednesday, April 16, 2014

DIY easter mason jars

TGI-Wednesday ya'll! I'm wiped- after several sleepless nights this week and really busy days, I took tonight off from my to do list. Sometimes, its necessary to just enjoy dinner out with your husband and fill Easter Eggs with with your cat. Isn't she a sweetie?


But before Easter arrives I had a quick DIY project to share with you: Easter mason jars. You know my love for mason jars, so naturally I needed some for Spring as well!

My inspiration for this project came from No. 2 Pencils.


This is a very easy project that can be completed using recycled objects. Grab an old mason jar or some glass jars from your recycling bin and some paint. That's it! Check out how they turned out:


I am linking up today at House by Hoff!


Tuesday, April 1, 2014

a DIY flower pot

ahhh Spring ya'll ... the weather this week is beautiful and most welcome after the cold of last week!


I would really like to just forget school work and just sit outside, do craft projects, and start on my Spring cleaning! Just a few more days until break .. I think I can, I think I can!

I have a super quick DIY project to share with you today! We planted some flowers the past weekend and I thought the flower pot on my front porch was just too plain! I used chalkboard paint and twine to add a personal touch! I think it turned it out really cute!


I have few more Spring projects in mind and of course my Spring Mantel is ready to reveal.. check back soon!

I am linking up today over at House by Hoff


Tuesday, February 25, 2014

a DIY window frame

Hi friends,

I'm excited to share this long awaited project with you today .. it has been on my to-do list for what seems like forever!

Along with my love for mason jars and wooden signs I have a love for old windows as well. They are rustic and unexpected and beautiful whether plain or a little dressed up. I have been pinning inspirational pictures of ways to use old windows for months now. Check out some of my  favorites:


Sources clockwise from top: (1) (2) (3) (4)

Several months ago I had bought a $5 window from the Habitat ReStore. It wasn't exactly what I was looking for because it only had 2 panes but I repainted it cream and used it anyway. You can see it used several times above my mantel in previous posts! This past Christmas I bought an old window from a antique store with this project in mine. I had originally thought I would either repaint it or stain it but decided I liked the shabbyness of the cracked paint. You can see it used here in my winter mantel!

And today my pictures from Shutterfly FINALLY arrived so I used some tape to attach the photos to the glass. And really that is it for this DIY project!


Love it! Maybe later on I will add some words like in the photos above. So many choices!

Oh and if you want a new "old" frame, you can find them at Target!  I have also seen them at Kirklands. :)

Monday, January 20, 2014

chalk paint mug + sharpie plate

Hi friends,

I hope you had a nice 3 day weekend .. I have really enjoyed mine and will share about my weekend tomorrow!

Today I wanted to share with you 2 really easy DIY projects!

First up, DIY Sharpie Plate


Using a plate from the Dollar Tree (could also used a thrifted plate) I took a sharpie and monogrammed the initial for our last name. I would recommend using a stencil if you can. I then baked it at 350 for 30 mins in the oven.

Next up, DIY Chalk Paint Mug


For this project I bought a mug from the Dollar Tree and used chalk paint to cover it. It took about 3 coats and then I baked it in the oven at 350 for about 30 mins. I have not tried it in the dishwasher, but I am able to wash it without any problems! You can write anything you would like on it!

 So, that's it! 2 easy projects you can customize to fit your style!

Monday, January 13, 2014

our DIY office

Happy Monday folks!

The hubby is busily putting the final touches on his Commissioning paperwork (75 pages of answering theological questions, a videoed Bible Study, and a videoed sermon-- all part of the steps to becoming an ordained minister in UMC) and when he sends it off on Wednesday it will be a celebration in our household! Tomorrow is also his LAST first day of school EVER. Super proud of him! :)

I have a few projects that are in process (see: overwhelmed by to do list) but they are not getting finished in the time I had hoped. So, instead, today I am going to share some photos of our office and the DIY projects we completed for it. These projects were all completed pre-blog days.

Our office needed to serve 2 purposes: a music area for Justin and a normal office area for school work. Justin is a big NC State fan and of course has lots of State gear. Half of it went to Justin's office at work and half of it stayed at our house. So, with those things in mind, gray, red, black, and white became our color scheme. We painted the walls a light gray and used red to accent with.

Our first DIY project was our desk. It is made from an old door! We bought the door at The Habitat for Humanity Resale store for $5 and then painted it white. We added legs and drawers from Ikea and we now have a HUGE workspace!


The inspiration for the desk came from this photo and tutorial at Shelterness.


Our next DIY project were the $10 shelves above our desk. We followed plans from Ana White. We altered the sizes just slightly and decided not to add the edge piece. Other inexpensive options for shelves like these come from Ikea. They have both skinny picture ledges and wider shelves (like those in our dining room here).


My inspiration for the shelves came from The Crafty Teacher Lady. This photo also inspired the shelves in our dining room!


I decorated the shelves with DIY art and thrifty finds. The LOVE artwork was a gift from my crafty friend Heather. The Faith photograph is a picture I took and the Proverbs verse was a DIY project you can look at here.

Our last DIY project is a memo frame from Shanty 2 Chic. This is one of my favorite projects!


I simply bought a large frame from Garden Ridge (I looked at thrift stores first but couldn't find one I liked), removed the glass, and used a staple gun to attach the ribbon and twine.

Here are some other views of our office and Justin's music nook:


The bookshelves are just from Wal-Mart and I am dying to replace them with an Ikea shelf! The black CD cases are from Ikea and the red baskets/buckets are just from the Dollar Tree.


 Secretly crushing on an Ikea shelf like this one! Love how it is styled! Source.


Also love this idea and may be updating our shelves with our initials! Source.

And that is all for today!

Tuesday, December 24, 2013

Creative DIY gift wrapping

What happens when you combine plain brown kraft paper with your presents? The most adorable, creative,  DIY embellished gift wrap! I'm excited to share with you today how this year I personalized simple kraft paper to give it my own unique look.

Since we travel away from our home for Christmas I do not wrap presents until I get to North Carolina. Easier to pack and you don't have to worry about squishing anything or ruining wrapping paper. I did manage though to make it here without my any other wrapping supplies except my kraft paper! However, I made it work with the the materials that were on hand and I borrowed some ribbon!

Pinterest was FULLLL of inspiration for this project .. check out some of my favorite's below!

 Sources clockwise from the top:

 Sources clocwise from the top:

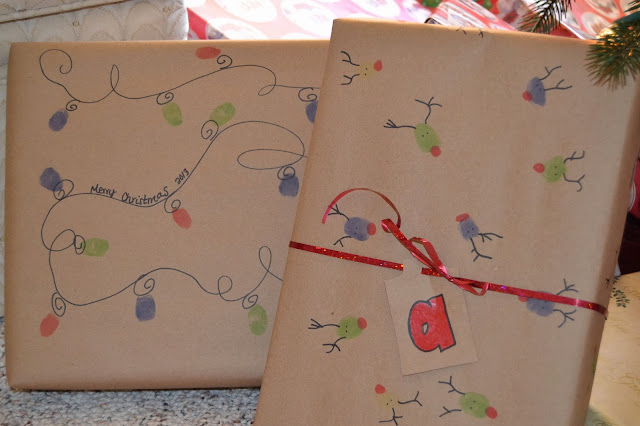
When I saw the thumbprint reindeer and Christmas lights I knew I had to make them! So I ended up using markers to color my thumb and creating both of these looks for the kids packages. These are my absolute favorite .. love how they turned out!

I was also a big fan of the gift tags also made from kraft paper. I simply drew myself a template and cut out enough for each of my gifts. I decided to use first initials so I drew those on my gift tags and attached them to the packages using ribbon. 

For the rest of my packages I used an assortment of some of the ideas above .. and a few not pictured. I added ribbon, pieces of regular wrapping paper, paint to make polka dots, and snowflakes. The snowflakes were so easy to make .. I just followed these instructions:


And here is how they all turned out:


My hubby says I spent way too much time .. but it was fun!

Merry Christmas!